OAuth 2.0
Implementing OAuth 2.0-Style Authentication in GTWY
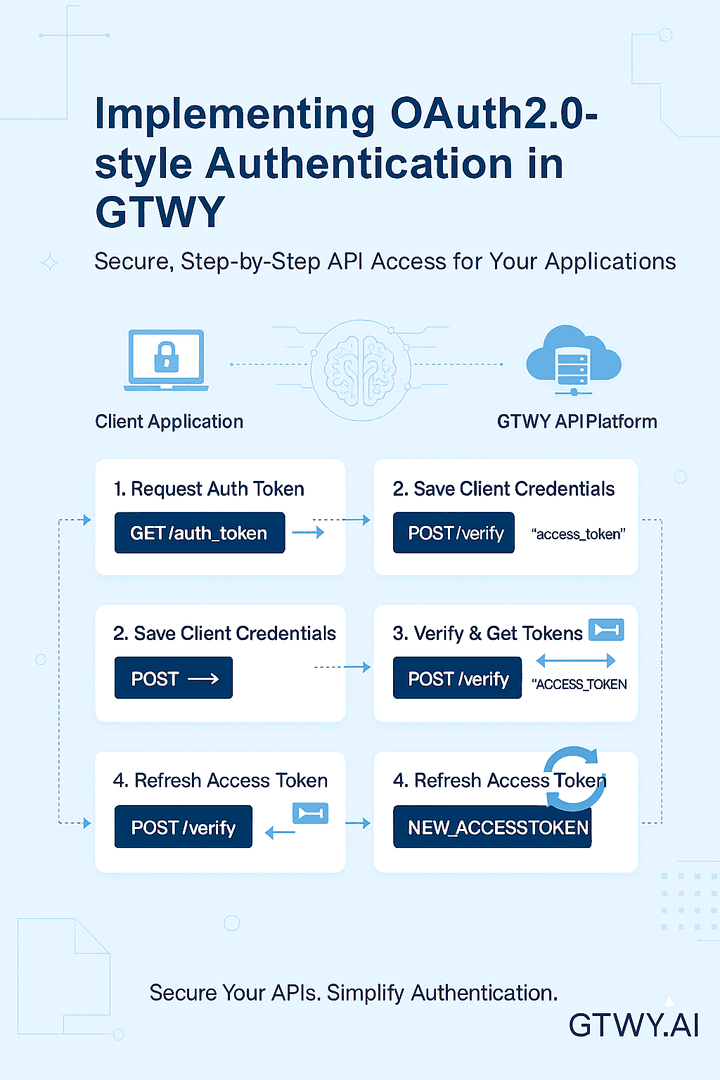
Authentication is the backbone of any secure system. GTWY makes it simple by offering an OAuth 2.0-style flow that handles token generation, verification, and refreshing — all through clean, predictable API routes.
This guide walks you through the complete authentication flow step-by-step.
Overview of Authentication Routes
Route | Method | Purpose |
|---|---|---|
|
| Generate or retrieve an authentication token |
|
| Save client credentials |
|
| Verify token and issue access credentials |
|
| Refresh the access token |
Each route plays a role in securely managing authentication between your client application and GTWY’s backend.
Step-by-Step OAuth 2.0 Flow
Let’s break down the complete flow, step by step.
Step 1: Generate Auth Token
Route:
GET /auth_tokenController Logic:CreateAuthToken
Generates a unique 14-character auth_token.
If the token doesn’t exist in the organization’s metadata, it saves it in the database.
Example Response:
{
  "auth_token": "x9kYpT6sZr8LqW"
}
The Auth token acts as a unique identifier that will be used in later steps.
Step 2: Save Client Credentials
Route:
POST /Payload:
{
  "client_id": "CLIENT_ID",
  "redirection_url": "YOUR_REDIRECTION_URL"
}
Example Response:
{
  "success": true,
  "message": "Auth token saved successfully"
}
This step associates your client_id and redirection_url with the generated auth_token.
It’s essential for verifying your client before access credentials are issued.
Step 3: Verify Token & Issue Access Credentials
Route:
POST /verifyPayload:
{
  "client_id": "CLIENT_ID",
  "redirection_url": "YOUR_REDIRECTION_URL"
}
Example Response:
{
  "success": true,
  "message": "Auth token verified successfully",
  "access_token": "ACCESS_TOKEN",
  "refresh_token": "REFRESH_TOKEN"
}
Once verified, GTWY issues:
access_token — Used for making authenticated API calls (short-lived).
refresh_token — Used to request a new access token when it expires (long-lived).
Step 4: Refresh Access Token
Route:
POST /refreshPayload:
{
  "refresh_token": "REFRESH_TOKEN"
}
Logic:
If the refresh token is valid, a new access token is issued.
If invalid or expired, a 401 error is returned.
Example Response:
{
  "success": true,
  "message": "Access token refreshed successfully",
  "access_token": "NEW_ACCESS_TOKEN"
}
Notes
access_token — Short-lived token used for authorized API requests.
refresh_token — Longer-lived token that generates new access tokens without reauthentication.
For added security, you can store token expiry times and implement revocation logic to invalidate tokens when needed.
Why OAuth 2.0-Style Authentication?
This flow ensures that your integration with GTWY is:
Secure – Tokens are verified and refreshed safely.
Scalable – Works seamlessly across multiple users and applications.
Standards-Based – Follows the familiar OAuth 2.0 token exchange pattern.
Final Thoughts
By following these simple steps, you can integrate OAuth 2.0-style authentication into your GTWY-powered applications.
This flow keeps your API requests secure, reliable, and ready for scaling across users or organizations.
Once configured, your application can safely interact with GTWY services using tokens — ensuring both performance and protection.